Sage X3 Consultant Tip: Customizations Patches in Sage X3
Sage ERP Consultant: 4 Steps to Make Customizations Patches in Sage X3 Throughout the year, Sage releases an occasional patch for Sage X3 in order to...
More and more businesses are transacting money through Electronic Funds Transfer (EFT) as a preferred payment method. What business wouldn’t want a faster, easier and more secure method of processing payments? EFT is especially attractive if you have many transactions to process. With all the talk of fraud prevention, it’s important to make sure that the system is controlled with Fraud Risk Management to prevent fraudulent transactions such as the ‘ACH Fraud’.
As ERP consultants, our Sage X3 customers are delighted learn they can initiate payments to vendors and employees through EFT. Sage X3 processes the transactions seamlessly with the best security features in place provided by your bank. In this blog, we will illustrate how easy it to setup your EFT functionality in Sage X3. We will also explain how the Finance Module can be configured to get the best results in generating the ‘EFT File.’ This is the file required by each bank to automate transactions based on the payment entries from your Sage X3 system.
Before we get started, you must first get the each bank’s specifications of their unique format of the EFT file in order to be recognizable by their system. You can usually find their requirements on each bank’s website. Also, note that Sage X3 can support multiple banks. You can set up multiple configurations for multiple bank accounts which will all functional at the same time!
Please be advised, anytime you are considering making changes to your Sage X3 system, it’s recommended that you consult with your certified Sage X3 consultant firm. If you don’t currently work with one, please contact us and we will be happy to learn more about how we can help you with EFT or in other areas of your business.
These steps apply to Sage X3 Version 7. Version 6.5 also has the same functionality with respect to EFT functions that we will go through during the set up procedure. It is recommended that the following steps are done sequentially in order to avoid missing any important configurations.
Step 1: Define a Payment Method
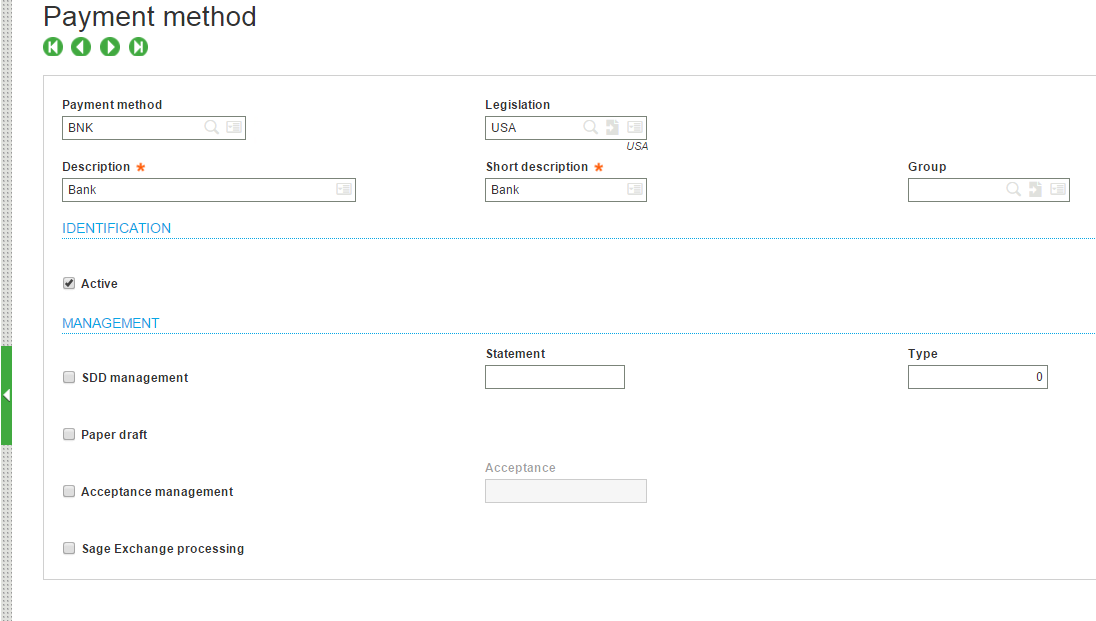
This will define a Payment Method that will associate to the Payment Entry Type and Bank Account in the next steps. A Payment Method will filter open items according to what is assigned to each vendor at the Supplier Master Setup.
Navigation: Common Data > BP Tables > Payment Methods
Minimal requirements: Payment Method Description, Legislation, and ‘Active’ state.
Step 2: Configuring the Bank File
This is the most important step of the complete EFT Configuration. As per the requirements set by the bank with a Standard format of the EFT file, this setup is done following the specifications mentioned. It’s recommended to have a call with the bank to make sure you are picking the right format as some banks have multiple formats for different kinds of systems.
Provide details about your ERP with high level requirements to help the bank associate direct you to the right format.
The configuration is done based on this format specifications mentioned above at Bank File function in Sage X3
Navigation: Setup > A/P-A/R accounting > Files > Bank
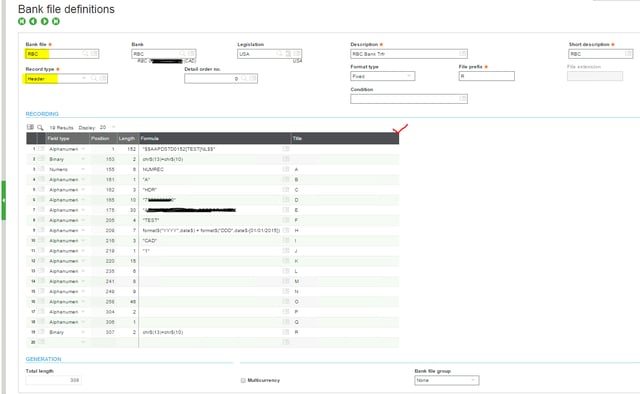
This step may require a Technical Consultant with expertise in 4GL Formulae to set the formula at various lines as per the specifications. The following shows the Bank File setup for RBC Bank. Usually each Bank file needs three entries – Header, Detail and Trailer. Some banks may have multiple Detail lines.
Step 3: Define a ‘Payment Entry Transaction’ type
This will define a type to select from the list during the Payment Entry. Usual types include ‘Automatic Check Payment’, ‘Check Receipt’, etc. This setup defines how your entry should flow through the validation steps before posting it to the General Ledger.
When you have multiple Bank Accounts, it is important that you need to create multiple ‘Payment Entry Types’, one each for your multiple bank accounts.
Payment Entry type will define the unique setup for which Bank Account the payment will be generated to. It also defines the EFT file format (discussed in Step 3) based on which the payment information will be generated.
Navigation: Setup > A/P-A/R accounting > Payment entry types
Select the Payment Method (discussed in Step 1) under this ‘General’ Tab
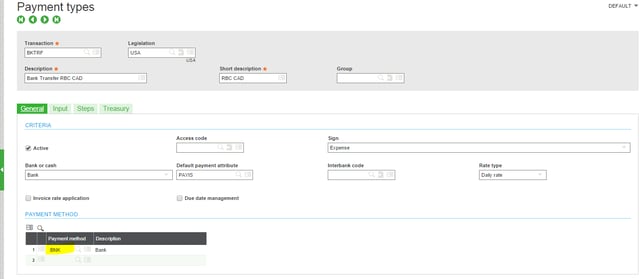
Check the various information that you would like to see on your ‘Payment Entry’ function. You may need to have the ‘Bank ID number’ (discussed later) checked so that you can see it in the Payment Entry.
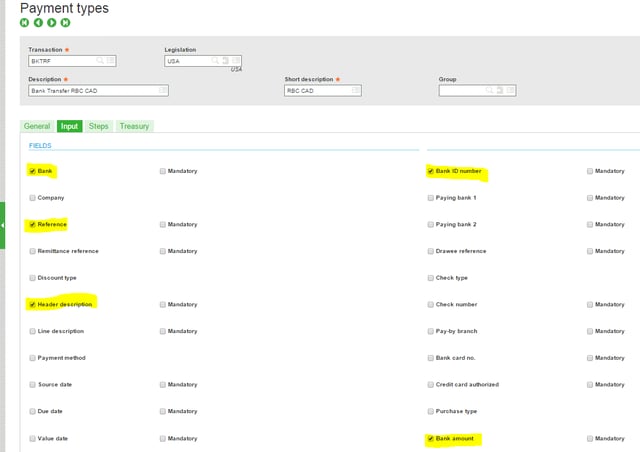
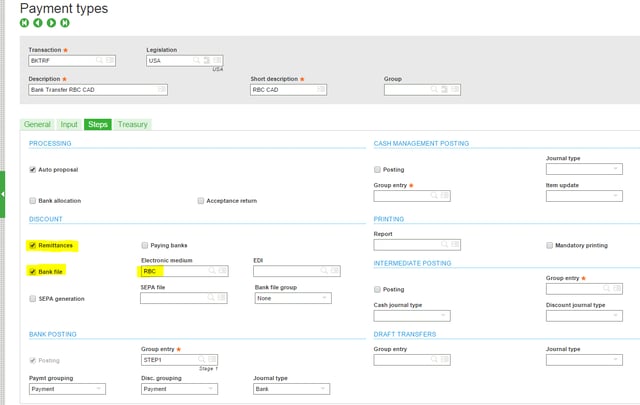
Check ‘Remittances’ (to allow creation of Deposit records), ‘Bank File’ (an EFT file format we configured in Step 2) and Select the ‘EFT file format’ under the field ‘Electronic Medium’.
Step 4: Set up Bank Accounts
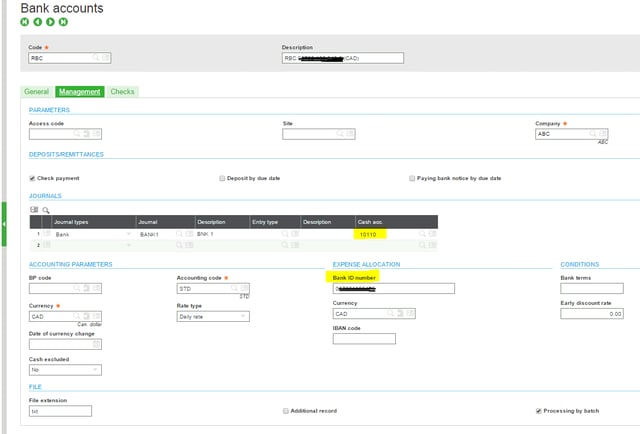
As mentioned earlier, Sage X3 can support full-fledged Bank Setup for multiple accounts. For the use of EFT, a few fields become mandatory to be filled in as highlighted below:
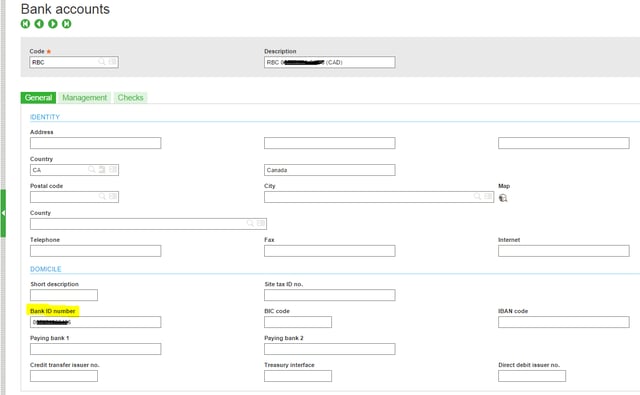
and...
Step 5: Set up the Payment Terms
Setting up the Payment Terms is a part of the basic Financial Setup. For any Payment Terms specific to EFTs, make sure that the associated Payment Method is selected in the setup screen.
Navigation: Common Data > BP Tables > Payment Terms

Step 6: Supplier Master Setup
Navigation: Common Data > BPs > Suppliers
Minimal Requirements: The highlighted fields as shown below will be mandatory for a successful EFT Configuration.
• Select the Payment Terms defined in the previous step
• Select the Bank Account created previously
• Enter the Supplier’s Banking information under ‘Bank ID no.’ Tab
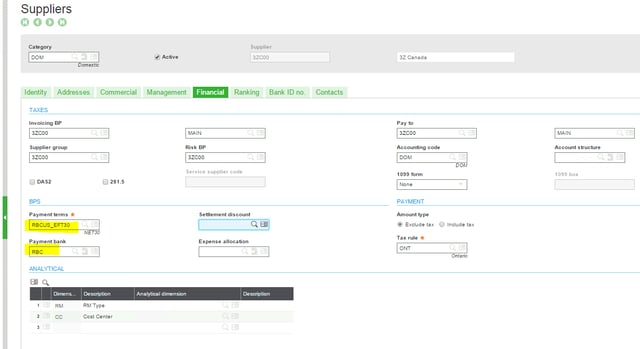
and...

This is the end of EFT configuration. The following steps will explain the generation of the EFT file for Payment Entries made.
Step 7: Initiating an EFT Payment from Sage X3
There are two ways in order to create Payment Entries from the following functions:
• Payment/Receipt Entry
• Payment Proposals
Let’s do one sample from the complex approach – ‘Payment/Receipt Entry’ function
This function has a better control to manually select the Open Items and make Overpayments, Under payments, Partial Payments, etc.
As per the steps mentioned under ‘Steps’ tab of Payment Entry Transaction, the file will be generated.
Navigation: A/P-A/R accounting > Payments > Payment/Receipt entry
Pick the appropriate Payment Entry Transaction (as discussed in Step 3) and create a Payment Entry
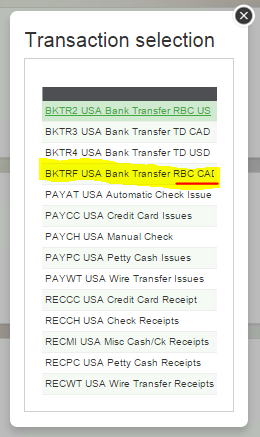
and...
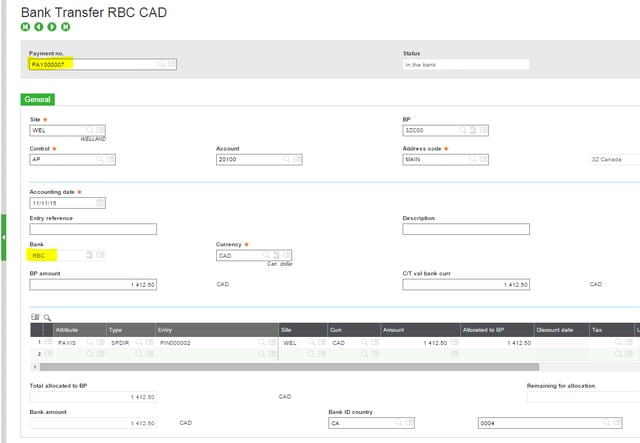
Step 8: Generating the EFT File
Record the deposits using ‘Manual Remittance Creation’ function making an entry by pulling multiple Payment Entries to the selected ‘Bank Account’ and ‘Payment Type’. This creates a Deposit Number by Sage X3. The following example shows multiple payments for different vendors for the same Bank Account (RBC, in this case).
Navigation: A/P-A/R accounting > Remittances > Manual Remittance Creation
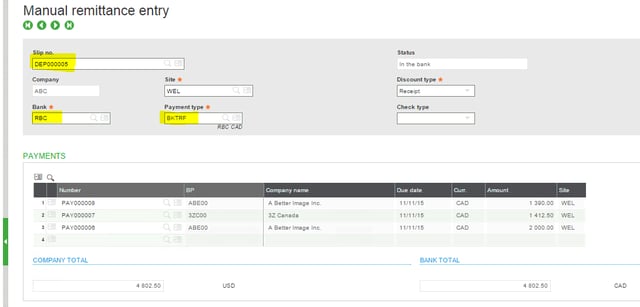
Once after creating a ‘Deposit’, you can go ahead in generating the Bank File by clicking the ‘Bank File’ function from the Right Panel List.
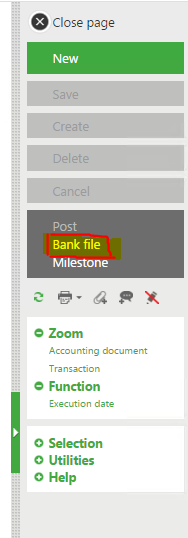
This will open a pop-up window asking you to confirm creation of the file. The file will be generated in the below mention Folder Address by default. Have a shortcut created in the Desktop as you will be frequently opening this Folder to access the generated file.
The boxed highlight in the path will be the Sage X3’s Assigned Folder for transactions.

This folder will be a repository of the files generated on an everyday basis. Archive the files in folders by month/bank for better organization. In this case you will see files starting with R, RU, T and TU - specifying files of various Bank Accounts. The file(s) for the day then need to be uploaded into the Bank’s Website for the actual bank transaction to happen. In the testing phase, ask the bank associate to provide you sessions to test your file in the bank environment to check for any errors.
This setup is very efficient to initiate and process Deposits, Cash Transfers, Bill Payments, etc. and can save huge amount of operational time. It is highly secure and Fraud Proof, as the Bank rejects a file and fails a transaction if any of the required component doesn’t match with their records (or) due to wrong file formats.
Hopefully, this will help your EFT implementation and troubleshooting.
Need help setting up EFT in Sage X3?
Call us at Mantralogix and we’d be pleased to help! We help small to midsize companies select the tools that most effectively meet their business requirements both today and for the future. We provide solutions for businesses across diverse industries. Please feel free to post your questions in the comments section below. Call our Mantralogix team at 1-866-320-8922 and a Certified X3 consultant would be more than happy to help you!
Find out how the Mantralogix Advantage can be your competitive advantage. For us, it’s personal, not just business. Contact us today.
Mantralogix – ERP System Implementation Specialists
Mantralogix consultants are experts in ERP system selection and implementation. We can guide small to midsize businesses through requirements definition, selection, and implementation of the software solution that’s right for your particular needs. Leverage Mantralogix’ experience to provide true business value and a competitive advantage. We provide services for an extensive variety of businesses in many industries. Training and on-going support provide long-term value to our customers now and in the future.
Find out how the Mantralogix Advantage can be your competitive advantage. For us it’s personal, not just business.
As a trusted technology partner, Mantralogix delivers enterprise software solutions to both Canadian and U.S. businesses. We are happy to receive your inquires for any types of services which you are looking for and will focus on ensuring your requirements are met. Please call us at 1-866-320-8922 or email us.
About Mantralogix
Mantralogix specializes in the implementation, support, and training of world-class ERP solutions from Sage, including Sage MAS 500, Sage 300 (formerly Accpac), and Sage X3, Sage PFW, and Sage BusinessVision Accounting (BV). We also help with CRM, HRMS, custom development, hardware, and IT consulting and outsourcing. Mantralogix has in-house expertise in designing, developing and implementing solutions for financial, manufacturing and distribution verticals. Contact us today at 866-320-8922 or visit www.mantralogix.com
Topics: sage erp x3, erp, Sage X3 ERP, Sage X3, X3 Payment, EFT Setup, EFT Configuration, EFT
Photo courtesy of www.freedigitalphotos.net Dollar Symbols Coming From Screen” by Stuart Miles
Sage ERP Consultant: 4 Steps to Make Customizations Patches in Sage X3 Throughout the year, Sage releases an occasional patch for Sage X3 in order to...

Sage X3 Consultant Question: How do I close month (period) end in Sage X3? One common question we get from our Sage customers is month end and year...
Sage X3 Consultant Question: Action Field Options I was working in the development tools in Sage X3 and I’ve been asked to update certain fields...